 Project
[Project] The Reframe 360 Plugin
The „reframe360“ plugin is something I started a few weeks ago out of the wish to be able to edit footage recorded with my at the time freshly bought Gopro Fusion 360 degree camera in DaVinci Resolve. Also I found Gopros own reframing (choosing a normal perspective camera angle within the 360 footage in editing) plugin, that is provided for free for the Adobe Premiere and After Effects, to lack a lot of functionality (even a simple rectilinear perspective projection is not implemented, only fisheye variants). Another motivation to start this project was to get some practice in GPGPU programming (CUDA and OpenCL).
After getting a prototype to work and asking a few people if they wanted to try it, I found that the interest in OpenFX plugins for Resolve is very low (and the developer support by Blackmagic, the company behind Resolve is very weak as well), so I decided to also implement the plugin for the Adobe Platform, which is far more popular within the main target group of consumer 360 camera owners. I’d had some experience developing
After Effects plugins and there are a lot of sample projects in the SDK that can be used as a starting point for your own project, so I used one of the new GPU filter examples to get started and quickly ported the already working C++ code to the new host platform. The CUDA/OpenCL kernels (the code that gets compiled and executed on the GPU) could be left exactly the same, but of course the setup and parameter handling required a lot of adaptation.
I have to say that the way Resolve implements GPU effects seems much better integrated into the software (which doesn’t surprise, as in my knowledge Resolve does all of its image processing on the GPU), in the Adobe platform the implementation is quite complicated / confusing, mainly because the CPU entry point procedures are using the After Effects SDK whereas the GPU part uses the Premiere SDK. This lead to a lot of problems when I was trying to implement a custom keyframe interpolation, as I head to query the set of keyframe times and values explicitly and not just rely on a simple query of a parameter value at a given time. The function to query the next keyframe from a given time was working fine when run from Premiere but not working at all when run from After Effects, so after a lot of tinkering I found no other way to create a global keyframe manager that gets filled with all of the keyframe data of the parameter in the frame setup procedure (luckily there is a frame setup command that gets called before every rendering command), which can then be queried by the Premiere SDK GPU rendering entry point. This is quite a workaround and shows the lack of effort Adobe puts into its SDK support (more on this in another post).
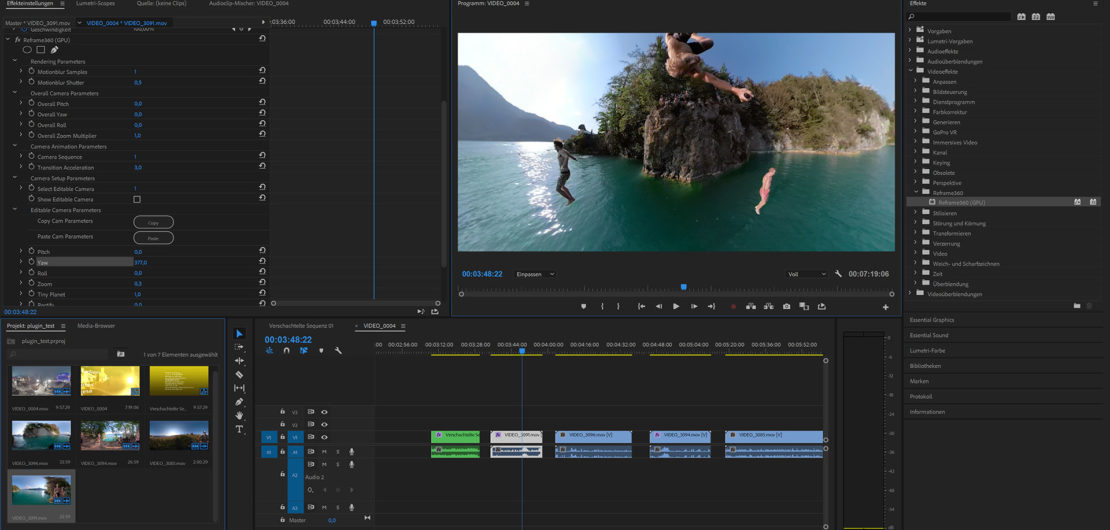
So what is the unique benefit of using this plugin vs. the one provided by Gopro? Well apart from also being available for Davinci Resolve and the possibility to use a normal perspective projection without fisheye-distortion, I took an approach to animating the reframing of the footage that is very different to the one taken by the Gopro-provided plugin: You setup your camera angles in up to 20 camera parameter slots, and then animate between them by keyframing the camera index number. Additionally, you have another set of parameters that act as an overall offset, so you can do adjustments that affect all of the cameras. Want to decrease field of view generally? no problem, just one simple slider drag. This approach prevents the user from having to keyframe a lot of parameters and copy them around to animate between cameras, only one parameter needs keyframes in my version. The animation interpolation can also conveniently be set by a slider, providing a simple polynimial interpolation with increased „snapyness“ as the value gets increased (1.0 being standard linear interpolation, 2.0 quadratic… and so on).
As I am developing this plugin and also during the beta / marketing / publishing phases I will try to post about my experiences and thoughts.